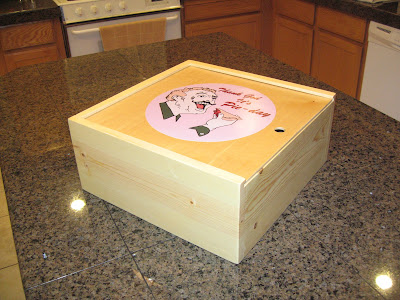
The inspirational box from Pushing Daisies.

I'll get into how the image for the lid was created in Part 2. For now I'll just address the box itself.
The box in the TV show is a prop and appears to be made out of 1/2" pine with butt joints. I don't think that box could carry a real pie. Or at best it wouldn't stand up to the use and abuse of the real world. I wanted to make a box that would work and last. Plus, based on the dimensions April provided me, her pie pans are on the large side.
The box I was to make needed to have internal dimensions measuring 13.5" square by 5.5" tall. I decided to use 3/4" pine for better strength. That then produces a box with external dimensions measuring 15" square by 6.5" tall.
Click on the image above to go to the 3D Warehouse where you can download the model.
I decided to give Google Sketchup a try for modeling the box. I could have used AutoCAD, but I liked that Sketchup made collaboration easier. I used to use Pro-Engineer back when I worked as a mechanical engineer, so I'm familiar with working with 3D models. Sketchup is really easy to use. It does lack some of the more sophisticated features of Pro-E, but it gets the job done. And free is always nice. It certainly was easier to make changes in Sketchup than in AutoCAD.
For the top and bottom I found some sanded 1/4" birch plywood that closely matched the color of the pine. For the joints I wanted something stronger than a butt joint. I gave some thought to dovetail joints or even a simple box joint. But for this project I was trying to maintain the look of the box from the show. So I went with a dado joint. The bottom of the box and lid fit into 1/4" dadoes. The bottom is not glued but is left free floating. The lid slides out one side.
If others want to make boxes of their own then I recommend adjusting the box dimensions to fit your pie pans. My own pans are typical 9", so when I make some of my own I will reduce the size to 10" square by 4" tall internal (or something like that, I haven't really worked that out yet). Others may also want to play around with different wood species and/or joint options. One nice thing about pine is it's very lightweight. Although it is harder to find straight pine boards at you local hardware store. It took some digging to find good ones. Be sure to avoid twisted, bent, or cupped lumber. Life is just too short. Time spent finding good stock reduces time in the shop.
The dado joints were a piece of cake. I've done dovetails and box joints before, so I'm equipped and not intimidated by the process. The blind and through dadoes I needed were created with a makeshift router table

The dadoes were just 1/4" so I cut rabbets in the adjoining piece to form a 1/4" tongue that fits the dado. The rabbets were cut on my table saw with a stacked dado head cutter. I did run into a little trouble here getting the rabbets cut to the right depth. Too deep and the tongues fit too loosely. Too shallow and there's no getting the joint together. After a little trial and error (and getting boards that are not cupped...see above) I was able to get things adjusted just right. I figured out that the table insert (that goes around the blade) was not adjusted evenly and was giving me a shallow cut on one side and a deeper cut on the other. I need to get me a better insert.
Also, I had forgotten how much pine tears when making cross cuts so a couple pieces ended up having the last little bit tear off. I was able to orient them so the worst offenders are on the bottom of the box though. Next time I will be sure to use a backer piece to help reduce tear out.
To finish it I had given some thought to using oil with a rubbed on wax finish. But after pricing that I just went with polyurethane. I used a Minwax Wipe-On Poly though to give it the same look and texture. I think it worked out well. April wanted to retain the natural pine look with no sheen, so I just used clear satin poly.
I gave all the pieces a good sanding with 120 grit sand paper (on my orbital sander) before glue up. After assembly and once everything dried I sanded with 220 grit (on the orbital sander). Wiped everything down with cotton cloth soaked in mineral spirits to get all the dust off. Then applied 3 coats of the Wipe-On Poly with a cotton cloth, sanding with 220 grit (by hand) between each coat (and cleaning the dust with mineral spirits). I gave it a final light (hand) sanding with 220 after the final coat.
This was my first time using the Wipe-On Poly. I think I really like it. Even though it's clear it did yellow the pine a bit, but that's typical for pine and it ended up matching the prop anyway. It doesn't make a very heavy or thick application, so I don't recommend it for floors or items that get some extreme use. The bottle suggests it to be used on furniture though, which I think would be fine. Three thin coats (to avoid nasty drips) seems like the minimum I'd apply. I was going to go for 4, but I ran out of time. It probably would have been overkill anyway. I used vinyl gloves which worked fine. I've had other stains and varnishes eat through latex, so best to avoid that.
As much as I like woodworking, I'm not a big fan of finishing. Not because it's hard. It's just the waiting around for things to dry that kills me. I do like the detail work and spending time sanding and smoothing...getting things just right. Applying the finish is always fun as you can start to see how the finished product is going to look. But then having to walk away for a few hours before you can do more just sucks away the fun.

The final touch was a non-slip drawer liner to prevent the pie from sliding around in the box and ruining that perfect crust.
In Part 2 I'll explain the "magic" that went into creating the picture for the lid.
I'm going as The Piemaker for Halloween and was hoping for a prop, in addition to the rolling pin and plastic wrap. How much would you charge for a box for a non-family member?
ReplyDeleteI understand if this is too short notice and/or it's not your thing to do commission-based projects.
Sorry Rob, but as you stated, it's not my thing. I've made an attempt to document the project as best I could (perhaps more construction photos would have been good too) so that others can make their own, or have someone make it for them. I do these things as a hobby and taking commission just makes it seem too much like work.
ReplyDeleteGood luck with your costume, and I hope you can find someone to make you a pie box.
It's a bit difficult for those who doesn't know to much about woodwork. But thank you anyway, maybe I'll try it in a few days. Happy new year from Spain!
ReplyDeleteOops. Didn't see this entry before I commented. Great job on the pie box.
ReplyDeleteMy boyfriend made this for me for my birthday - it came out perfect! Thank you for the tutorial!
ReplyDelete