
I got this idea from Make: Magazine. The original article is available in their online digital edition. Additional information related to the article can be found here.
All the instructions on how to hack the camera are available in the Make article so I won't bother repeating it here. More great information on hacking the camera is also available at camerahacking.com (that used to be the URL, but it currently doesn't work, the current working forum location can be found at camerahacks.10.forumer.com/)
More photos of the completed rocket:
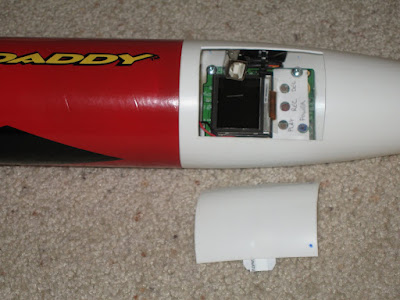
I glued some tabs (cut from an old plastic card...actually an old Disneyland passport) to the inside of the hatch door to allow it to "clip" in place. It took several tries to get the tabs on just right. The first tabs I glued on were configured differently and glued with epoxy. The door wasn't too secure (it felt loose) and the epoxy didn't hold. I tried again with the current tab layout with hot glue. That didn't hold either, but the door did seem more secure. So I glued them in the same place with plastic cement and that seems to be holding up much better. They've held strong now for 2 flights.
I do need to glue some tabs inside the nosecone though to prevent the door from falling inside. On the second flight I thought I lost the door, but it actually just slipped up inside the nosecone.

I used ShapeLock (a low temperature plastic) to plug the hole at the bottom of the nosecone to prevent the gases from the engine from getting into the nosecone and ruining the camera. This worked out well. While the inside of the body tube (and even some of the outer part of the nosecone) show scorch marks, the inside of the nosecone still looks perfect.

The camera is mounted using plastic standoffs that were glued in place with epoxy. So far, after 2 launches, the camera mounts seem to be doing just fine. Everything looks the same inside after the second launch as it did before the first.

The smaller battery (replacing the 2-AA original batteries to conserve weight) was mounted in a location where it can be easily replaced when/if necessary.
Of course, with a project like this the blog post wouldn't be complete without actual video from the rocket so here you go.
Launch #1:
The first launch was a huge success. Everything worked exactly as planned. Perfect (and impressive) launch. This was my first time using "E" size engines. Perfect chute deployment and a soft touch down. The camera worked exactly as I hoped.
Launch #2:
With the exception of the chute failure, this was also a good launch. Three of the six lines completely ripped free from the plastic chute. I'm not sure exactly what caused it. From the video though it looks like the rocket gets inverted just before the chute is deployed. In that position (I'm guessing) that the chute began to open and the body of the rocket either fell through the chute and caused several lines to tear loose, or the shock of the heavy body snapping against the cords caused it.
It was coming down pretty fast and I was very concerned it was going to hit the ground hard. There was no way I was going to let that happen so I ran after it to catch it. And catch it I did! Staying clear of the flailing body and nosecone I grabbed at the parachute and prevented the whole thing from smashing into the ground. The damage is pretty minimal and easily repaired, so this Big Daddy is going to fly again!
No comments:
Post a Comment