Showing posts with label chicken. Show all posts

Tuesday, March 20, 2012

Chicken Coop - Part 4

Part 3

Update showing decorative additions, heater, and modification to pull rope. Also showing hens, a little over a year old now.


More construction details with materials and rough dimensions in the video below.


Sunday, May 1, 2011

Chicken Coop - Part 3

Part 1
Part 2


It's done! Well, I guess it will never really be done. "It will continue to grow as long as there is imagination left in the world." (Or is that Disneyland?)

First some pictures of the chickens, then a video tour of the coop.


The head chicken in the pecking order is Eve, a Gold Laced Wyandotte.


The "1st lieutenant" is Pox, a California White.


The "2nd lieutenant" is Omelette, a Black Australorp.

The rest are in no particular order:


Skittles, a White Crested Black Polish.


June, an Easter Egger. She'll lay bluish green eggs.


Clover, a Welsummer.


And last (but always wants to be first), Dumpling, an Ancona.


Video Link

Sunday, April 10, 2011

Chicken Coop - Part 2

If you missed it, here's part 1.

More work completed on the chicken coop.

These photos were taken just after I finished all the hen house siding and wire (1/2" hardware cloth). We brought out some of the chickens to let them play outside for a while. Since there still wasn't a door I temporarily attached the lid from the brooder.


One week later - I finished the chicken run door, hen house door, nest box, and pop door. The chickens are in these pictures too, but are not living there yet. It's not quite finished and not ready for them to move in. So we let them out to play for a few hours each day.


The nest box lid opens up for easy access to collect the eggs.
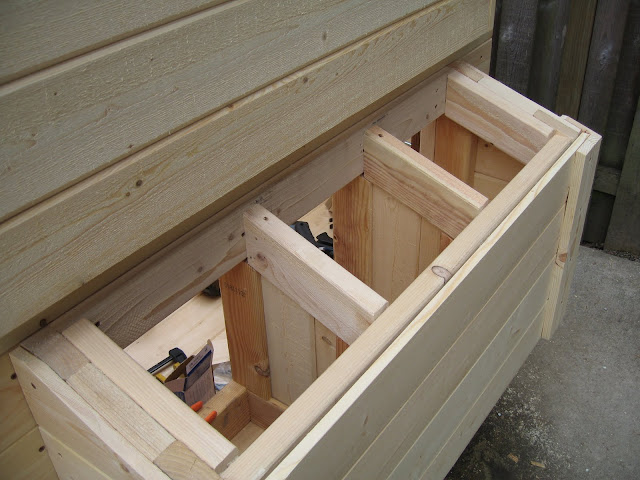


The side opens down to make for easy clean-out.
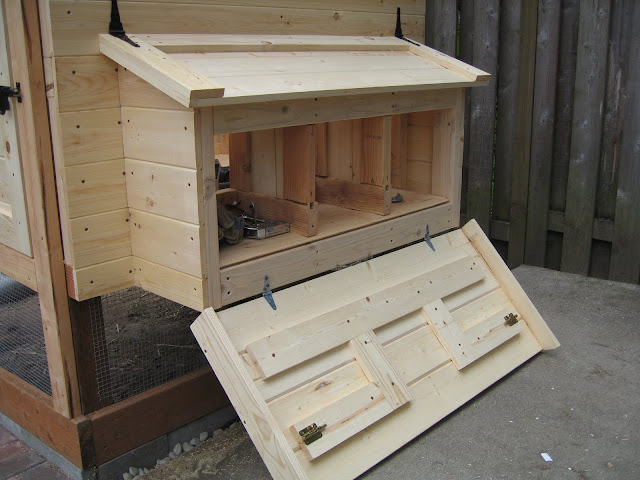


The hen house.


I do plan to clean up the tool clutter before the girls move in.


The pop door has a sliding panel. I'll attach a rope that will allow us to lift and secure it from outside the coop. I plan to have it motorized and automated some day, but manual will work for now. The upper-left opening is for the webcam.


A removable panel at the hen house door to hold back the bedding but still give us easy access to clean out the floor.


Some of the girls, out and about.


The last bit of work before the hens can move in is:
  1. Finish the trim
  2. Build ramp
  3. Stain
  4. Install windows
  5. Install roosts

Once they move in I can then :
  1. Install electrical (lights, etc)
  2. Install webcam


Go on to Part 3 - Complete
Part 4 - Update

Thursday, March 31, 2011

Chicken Coop - Part 1

(Edit 1/8/14 - Wow! I just noticed a major spike in traffic to this blog post coming from a couple homesteading and prepping sites. Very cool! Welcome all!

I get a lot of questions about plans and construction details, so after you look over the pictures in this 4-part series please take a look at the following video for more build info: Chicken Coop Construction Info. One of the referring sites implies that this is an inexpensive coop, which is really funny to me. It was actually quite expensive to build...close to $2000. Hardware cloth ain't cheap. But maybe you can get some ideas for a coop that can be built for less.

If you're into beekeeping feel free to check out my other Youtube channel The Bee Vlog. - Bill)

The chicken coop has been under construction for just over a month now but work has been going very slowly due to lots and lots of rain, and my busy work schedule. But here's how it looks as of today. (The cross bracing is temporary and will come down when I install the siding.)


The inspiration for the design of this coop came from the Wichita Cabin Coop. I'm making several design changes, but the overall concept is the same.

The order of construction went:
  1. Set posts
  2. Build roof (clear Suntuf panels)
  3. Bury border pavers (to block digging predators)
  4. Install base boards
  5. Install brick patio (so sick of the rain and mud - I needed somewhere dry and firm to stand)
  6. Lay 1/2" hardware cloth around other 3 edges (also to prevent digging) and spread river rock
  7. Frame the hen house and nest box
  8. Begin siding and floor (present state)


I'll be installing a webcam in the middle hole in the wall. It pivots so we can get a view inside the hen house and outside in the chicken run.

Next -
Part 2
Part 3 - Complete
Part 4 - Update