Saturday, December 26, 2009

Chainmail Tinkering

 
It's been a while since I posted any of my projects because I've been so busy with the projects themselves. One such time-intensive project is making some chainmail armor. After reading an Instructable on making mail I've been wanting to try the process out myself. It seems fairly simple.

Here are the 2 resources I've found most helpful: 

(I encourage visiting the source website for any updates, but just in case they are no longer available I have provided links to a PDF version of each.)

When I told David about my plans he got really excited about it and wanted to make some too. So we've been working together on this project. He's probably put in the most time so far with making rings and weaving his own shirt (with my help and guidance along the way).

Making Rings - 

I want 1/4" rings so according to the chart on the Mailmaker's Guide I would need to use 18 gage wire. I found some 17 gage galvanized electrical fence wiring at Ace Hardware, which seems close enough. At $16 for a 1/4 mile it's a good deal. While I was there I picked up a 1/4" metal rod, a couple needle nose pliers ("toothless" to prevent marring the rings), and metal cutting shears.

I had some spare plywood from a previous project that I used to construct a simple frame for the mandrel.
Ring forming station
Forming the coil around the mandrel was pretty easy. We picked up that skill right away. But cutting each ring from the coil took a great deal of learning and adjusting. At first we were cutting 2-3 at a time letting the jaws of the shear close all the way. This was causing the rings to open up and become misshaped. It would take only a few minutes to cut an entire coil (about 100 rings) but about an hour to reshape all the rings back into a round shape. There was no way this method was going to work out.
Misshaped rings need to be formed back into a circle

Eventually, David figured out that if you don't let the jaws close all the way, but just "nibble" off 1-2 rings at a time (letting the jaws bite into, but not completely cut the 3rd & 4th rings) then the rings don't open up. So this has been our method. After each "nibble" you have to pull the coil off the shears and let the rings come off the jaws, then carefully line the shears back up with the notches you left on the next rings so you can cut in the same spot again. It takes just a little bit more time to cut as you have to go slower and be more careful, but it saves a great deal of time.
Good cut ringsClosed rings
 
Video Link

Weaving - 

We started out by making a hauberk for David (following the pattern in the Mailmaker's Guide linked above) and speedweaving using the technique from the Instructable (linked above). I chose to start with this because it has very large areas of just standard weaving with only a few places to make expansions or contractions. I figured this would be one of the easier projects to start with. 

While I prefer the speedweaving method illustrated in the Instructable, David has come up with his own that I will illustrate below. I think either method takes about the same amount of time. The choice is really just a matter of preference. I like my method only because it gives the appearance of rapid progression even if you have to double-back.

David's speedweaving:
Modified speedweaving
Link the closed GREEN ring to the open RED ring, then attach the open RED ring to the mail through the 3 rings as shown above.

Since David has been doing most of the work on the hauberk (which is coming along nicely) I also wanted to do a quick and easy project. With our recent interest in Dungeons and Dragons I thought it would be cool to have a chainmail dice bag. It took some time to figure out how to do the contractions just right to round off the bottom of the bag nicely without getting the rings too bunched up, but I eventually figured it out. I also didn't want the metal rings to mark up my dice so I sewed in a satin liner. (Did I mention that satin is a pain to work with? The edges just fall apart with the slightest tug and it's so slippery. I eventually got it sloppily sewn together, but since it's inside the chainmail and won't really be seen I wasn't too concerned with the looks.) I finished of the top with a draw string. I'm really happy with the way it turned out.
Gaming dice bag (+1 AC)
After I finished it I looked online to see if this was a unique idea or if others had been making them too. Not only is it not unique (do a Google image search for "chainmail dice bag") but there are even kits. And just a few days ago I saw a video about one on the Make blog. Oh well.

So while David continues work on the hauberk I have also begun work on the coif (hood). I'll post pictures once they're all done.

Thursday, December 24, 2009

Halloween Costume 2009

It's nearly Christmas and I'm posting about my Halloween costume? Well, I'm a little behind, so I'm playing catch-up.

A couple months before Halloween, my sister-in-law went to a Disney convention where they had a large booth for Lost. She posted a picture of a Dharma jumpsuit that sparked the idea for me to make a Dharma jumpsuit for Halloween. I saw that ABC was selling a jumpsuit but it was more expensive than I would have liked, you can't choose the station logo, and you can't embroider your name/occupation on the pocket. I figured this wouldn't be too difficult of a DIY project.

Not from the convention...this photo was at Disney MGM Studios.


I searched around and found a similar project over at the Lost Blog. Unfortunately I was having a very hard time finding a jumpsuit. I tried the store mentioned in the Lost Blog post, but they were all out of my size in that color/style. But I did find a sewing pattern. It was time to call upon all the sewing skills I learned in 7th grade. (Not to worry, I had done a little bit of sewing since the 7th grade too.)

I bought the pattern, and enough material to make 2 jumpsuits (one for me, and one for David...another Lost fan in our family). I also bought the station patches (Orchid for me, Swan for David). Then I set to work.

The pattern was easy enough to follow. I didn't make any major mistakes. I did have to fudge a little bit on David's costume. The pattern didn't have an option for his size so I just made the smallest one (adult small) and it was too long. I just hemmed the legs and sleeves a little bit more than usual. Unfortunately the torso is still very long, but it doesn't look too bad.

The part I'm most proud of is the embroidery on the pockets. I was fortunate enough to be able to borrow my mother-in-law's embroidery machine. Lucky for me she is very much into sewing and has some very nice equipment. So I was able to add even more personal embellishments to the costume.

Station patch & pocket embroidery


The final result:

Dharma costumes

Sunday, August 30, 2009

Rocket Camera

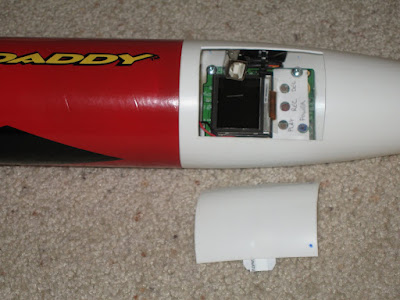
I finally finished the rocket camera project I started a while ago. Here's the finished product:


I got this idea from Make: Magazine. The original article is available in their online digital edition. Additional information related to the article can be found here.

All the instructions on how to hack the camera are available in the Make article so I won't bother repeating it here. More great information on hacking the camera is also available at camerahacking.com (that used to be the URL, but it currently doesn't work, the current working forum location can be found at camerahacks.10.forumer.com/)

More photos of the completed rocket:


I glued some tabs (cut from an old plastic card...actually an old Disneyland passport) to the inside of the hatch door to allow it to "clip" in place. It took several tries to get the tabs on just right. The first tabs I glued on were configured differently and glued with epoxy. The door wasn't too secure (it felt loose) and the epoxy didn't hold. I tried again with the current tab layout with hot glue. That didn't hold either, but the door did seem more secure. So I glued them in the same place with plastic cement and that seems to be holding up much better. They've held strong now for 2 flights.

I do need to glue some tabs inside the nosecone though to prevent the door from falling inside. On the second flight I thought I lost the door, but it actually just slipped up inside the nosecone.


I used ShapeLock (a low temperature plastic) to plug the hole at the bottom of the nosecone to prevent the gases from the engine from getting into the nosecone and ruining the camera. This worked out well. While the inside of the body tube (and even some of the outer part of the nosecone) show scorch marks, the inside of the nosecone still looks perfect.


The camera is mounted using plastic standoffs that were glued in place with epoxy. So far, after 2 launches, the camera mounts seem to be doing just fine. Everything looks the same inside after the second launch as it did before the first.


The smaller battery (replacing the 2-AA original batteries to conserve weight) was mounted in a location where it can be easily replaced when/if necessary.

Of course, with a project like this the blog post wouldn't be complete without actual video from the rocket so here you go.

Launch #1:


The first launch was a huge success. Everything worked exactly as planned. Perfect (and impressive) launch. This was my first time using "E" size engines. Perfect chute deployment and a soft touch down. The camera worked exactly as I hoped.

Launch #2:


With the exception of the chute failure, this was also a good launch. Three of the six lines completely ripped free from the plastic chute. I'm not sure exactly what caused it. From the video though it looks like the rocket gets inverted just before the chute is deployed. In that position (I'm guessing) that the chute began to open and the body of the rocket either fell through the chute and caused several lines to tear loose, or the shock of the heavy body snapping against the cords caused it.

It was coming down pretty fast and I was very concerned it was going to hit the ground hard. There was no way I was going to let that happen so I ran after it to catch it. And catch it I did! Staying clear of the flailing body and nosecone I grabbed at the parachute and prevented the whole thing from smashing into the ground. The damage is pretty minimal and easily repaired, so this Big Daddy is going to fly again!

Saturday, August 15, 2009

Pie Boxes - Part 2: The Picture

In Part 1 I documented the box construction. Here in Part 2 I'll be explaining the "magic" behind the making of the picture for the lid.

The box from Pushing Daisies has a very jolly looking man stuffing his face full of pie with the words "The Pie Hole" (the name of the Ned's pie shop). I scoured the web looking for the best possible image that I could use as a starting point. Unfortunately, one of the best ones I've found is shown below.


It's a great shot of the stars of the show, but not such a great shot of the image on the box. But it was the best I had so I gave it a try.

With GIMP I used the shear tool to stretch and manipulate the image until I had the picture as truly round as I could tell.


But the picture needed to be cleaned up significantly. Even if it's possible, my GIMP skills aren't good enough to remove the green string and improve the picture quality. So I took it to the analog realm. I printed it and traced it with pencil, then scanned the pencil sketch back into the computer.


Some of the image was too fuzzy and half of the hand is missing, so some guesswork was involved.

After scanning it I used Inkscape to convert the bitmap into vectors.

A quick word on image editors: GIMP (or Photoshop and equivalents) are pixel editors. When you resize an image it either just makes the pixels bigger (making everything look "blocky") or it has to extrapolate information from the nearby pixels to make more pixels (making everything look "fuzzy"). The nice thing about Inkscape (or Illustrator and equivalents) is that it uses vectors - lines - to create the image. Of course, the computer is still displaying the lines as pixels, but the software doesn't need to guess at what the pixels should look like when resizing the image. The vector information tells it everything it needs to know. You can take a 1" x 1" image and blow it up to 10" x 10" and it will look just as good.

Of course, there are limitations to vector graphics as well. They are really only suitable for working with illustrations, not photos. But since I was working with an illustration here it was going to work out nicely.

Converting the drawing from a bitmap to vectors is easy in Inkscape, but getting things to look the way you want takes some fiddling around with the tool. I don't remember the exact settings I used for this particular image. But it's pretty easy to just tweak the settings, test, and adjust as you go. After I had the line drawing converted to a vector graphic I was more easily able to clean it up. There were a few "blotches" here and there that needed to be removed. Some holes that had to be filled. And some of the lines were not as smooth as I wanted and had to be smoothed out. I did like how the lines had a bit of texture to them so I left most of that in. I think it adds to the look.

I used the reference image to add color by just using the color picker tool. When using this tool if you just click on the reference color you are actually only selecting a pixel. And since the colors are usually made up of pixels of various colors (especially in this case) you may not get the color you wanted. But Inkscape gives you the ability to sample an area and it finds the average color.

Then after I finally had it looking the way I wanted, I was watching a newly aired episode of Pushing Daisies and they actually showed a pie box in a nice clear shot from the top down.


Ugh! I sure could have used this image earlier. It would have required all the same steps except the need to stretch it out to get it shaped right. But this image showed the missing wrist detail that I was missing from my other reference. So a little nip here and a tuck there I filled in the missing pieces and had a complete image.


April wanted the name of her blog on the image for her boxes. No problem. The text tool made that simple enough.


I have high resolution images available for download for anyone that wants them. They're available in JPEG, PNG, or SVG (for use with Inkscape or other vector graphic editors). I have 2 versions. One that has the text "Thank God It's Pie-day" and the other with the original "The Pie Hole."

You'll find the files here. Just right-click on the file you want to download, select "Save link as..." from the pop-up menu, then save it to a directory on your computer.

Feel free to alter and edit them for your own use. All I ask is that you don't make a profit off the image itself. Not that I personally care. But ABC might have something to say about it.

If anybody makes any significant improvements to it (especially to the Pie Hole text which I'm not entirely happy with how it turned out) please share it back with me. Just comment below and let me know how to get it.

Trying to find a way to put the image on the lid gave me the most concern. On the prop all they did was tack on a piece of paper. Again, for a prop that's fine. But in the real world it won't hold up to real use. And as you can probably see from the reference images, even the prop isn't holding up well with edges curling up.

Some ideas I tossed around in my head were:

1. Iron-on transfer - This would require some testing to see how well it would transfer to wood, if it would hold up to application of polyurethane (or other finishing products), and if it would hold up to use. But since I needed a 10" image (to get the right proportions) this idea was shot down. The largest I can print on transfer paper is 8".

2. Laminated paper - Wouldn't look good.

3. Professionally printed on vinyl or plastic - Too expensive. I was quoted $35/print.

4. Painted on - This would look great and stand up well. But I don't have that kind of skill. If you can do this yourself or find a skilled friend I highly recommend this option.

5. Printed on photo paper - Photo paper is water proof (it goes through a wet process to get developed). If it gets wet just don't scrape it or wipe the water off. Just let the water run off and air dry it. And it's heavy enough that if glued properly it shouldn't curl up or tear. And Costco can do large format prints for just a couple dollars. So this was the option I chose.

I exported the image at 300 dpi and 12" x 18" and sent it to Costco. (The above downloads are the same size and resolution.) Glossy photos tend to show finger prints, so I chose the lustre option instead (a non-gloss finish). The next day I picked up the photos, cut them to size, and glued them on. (This is after the lids had been finished with polyurethane.)

I used regular Elmer's white glue, spreading it evenly on the back of the photo with a sponge brush (making sure to go all the way to the edges) and laying it carefully in place on the lid. I then spread a piece of wax paper over the top and used my hands to press and wipe from the center outward, spreading the glue towards the edges and letting a little of it seep out. The big trick here is using enough glue to get good coverage but not so much glue that you have a big mess to clean up. I made a couple mistakes of having a little too much glue.

White glue cleans up with water, so I used a wet cloth to carefully wipe around the edges, being sure to pick up the glue and not just spread it around. Some of it was getting onto the photo, but wiping carefully it will clean up.

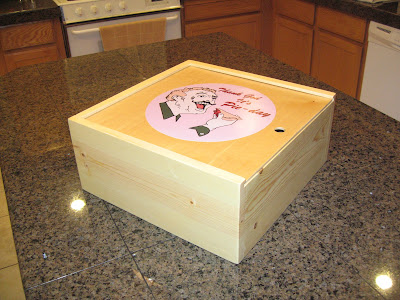
One last look at the final product...


April also posted some pictures on her blog including a close-up shot of the lid that shows off how clean and sharp the picture looks when created with Inkscape.

Thursday, August 13, 2009

Pie Boxes - Part 1: The Box

A few months ago (wow...has it really been 4 months?) my sister made a request for a pie box like the one used on Pushing Daisies (a very scrumptious show that everyone needs to watch). Little did she know that I had already begun the planning of such a project, but now with her help I could get the dimensions right.

The inspirational box from Pushing Daisies.


I'll get into how the image for the lid was created in Part 2. For now I'll just address the box itself.

The box in the TV show is a prop and appears to be made out of 1/2" pine with butt joints. I don't think that box could carry a real pie. Or at best it wouldn't stand up to the use and abuse of the real world. I wanted to make a box that would work and last. Plus, based on the dimensions April provided me, her pie pans are on the large side.

The box I was to make needed to have internal dimensions measuring 13.5" square by 5.5" tall. I decided to use 3/4" pine for better strength. That then produces a box with external dimensions measuring 15" square by 6.5" tall.


Click on the image above to go to the 3D Warehouse where you can download the model.

I decided to give Google Sketchup a try for modeling the box. I could have used AutoCAD, but I liked that Sketchup made collaboration easier. I used to use Pro-Engineer back when I worked as a mechanical engineer, so I'm familiar with working with 3D models. Sketchup is really easy to use. It does lack some of the more sophisticated features of Pro-E, but it gets the job done. And free is always nice. It certainly was easier to make changes in Sketchup than in AutoCAD.

For the top and bottom I found some sanded 1/4" birch plywood that closely matched the color of the pine. For the joints I wanted something stronger than a butt joint. I gave some thought to dovetail joints or even a simple box joint. But for this project I was trying to maintain the look of the box from the show. So I went with a dado joint. The bottom of the box and lid fit into 1/4" dadoes. The bottom is not glued but is left free floating. The lid slides out one side.

If others want to make boxes of their own then I recommend adjusting the box dimensions to fit your pie pans. My own pans are typical 9", so when I make some of my own I will reduce the size to 10" square by 4" tall internal (or something like that, I haven't really worked that out yet). Others may also want to play around with different wood species and/or joint options. One nice thing about pine is it's very lightweight. Although it is harder to find straight pine boards at you local hardware store. It took some digging to find good ones. Be sure to avoid twisted, bent, or cupped lumber. Life is just too short. Time spent finding good stock reduces time in the shop.

The dado joints were a piece of cake. I've done dovetails and box joints before, so I'm equipped and not intimidated by the process. The blind and through dadoes I needed were created with a makeshift router table


The dadoes were just 1/4" so I cut rabbets in the adjoining piece to form a 1/4" tongue that fits the dado. The rabbets were cut on my table saw with a stacked dado head cutter. I did run into a little trouble here getting the rabbets cut to the right depth. Too deep and the tongues fit too loosely. Too shallow and there's no getting the joint together. After a little trial and error (and getting boards that are not cupped...see above) I was able to get things adjusted just right. I figured out that the table insert (that goes around the blade) was not adjusted evenly and was giving me a shallow cut on one side and a deeper cut on the other. I need to get me a better insert.

Also, I had forgotten how much pine tears when making cross cuts so a couple pieces ended up having the last little bit tear off. I was able to orient them so the worst offenders are on the bottom of the box though. Next time I will be sure to use a backer piece to help reduce tear out.


To finish it I had given some thought to using oil with a rubbed on wax finish. But after pricing that I just went with polyurethane. I used a Minwax Wipe-On Poly though to give it the same look and texture. I think it worked out well. April wanted to retain the natural pine look with no sheen, so I just used clear satin poly.

I gave all the pieces a good sanding with 120 grit sand paper (on my orbital sander) before glue up. After assembly and once everything dried I sanded with 220 grit (on the orbital sander). Wiped everything down with cotton cloth soaked in mineral spirits to get all the dust off. Then applied 3 coats of the Wipe-On Poly with a cotton cloth, sanding with 220 grit (by hand) between each coat (and cleaning the dust with mineral spirits). I gave it a final light (hand) sanding with 220 after the final coat.

This was my first time using the Wipe-On Poly. I think I really like it. Even though it's clear it did yellow the pine a bit, but that's typical for pine and it ended up matching the prop anyway. It doesn't make a very heavy or thick application, so I don't recommend it for floors or items that get some extreme use. The bottle suggests it to be used on furniture though, which I think would be fine. Three thin coats (to avoid nasty drips) seems like the minimum I'd apply. I was going to go for 4, but I ran out of time. It probably would have been overkill anyway. I used vinyl gloves which worked fine. I've had other stains and varnishes eat through latex, so best to avoid that.

As much as I like woodworking, I'm not a big fan of finishing. Not because it's hard. It's just the waiting around for things to dry that kills me. I do like the detail work and spending time sanding and smoothing...getting things just right. Applying the finish is always fun as you can start to see how the finished product is going to look. But then having to walk away for a few hours before you can do more just sucks away the fun.


The final touch was a non-slip drawer liner to prevent the pie from sliding around in the box and ruining that perfect crust.

In Part 2 I'll explain the "magic" that went into creating the picture for the lid.

Wednesday, July 15, 2009

Makeshift Router Table

I'm working on a project right now that requires blind dadoes and I didn't want to spend any time with a chisel. Too many repeat cuts required, and I love power tools. But I don't have a router table. What's a tinkerer to do? Build one of course!


I had some spare particle board laying around that I use for temporary assembly/work stands. I just drilled a 3" hole. Aligned and drilled for mounting screws. Mounted with some #10-32 x 1" flat head screws. I've got a working router table.


I didn't need a tall fence, so some more scrap wood clamped to the table did the trick. Measure and mark where to start and stop the work piece and it's all ready to go.

In the image below you can see a close-up of the bit and fence. The workpiece shows the blind (and through) dadoes cut with this setup.


The downside to this type of setup is it's difficult to adjust the height of the bit. Especially with a plunge router like mine. It takes some finesse and a little brute force, but I didn't need high levels of accuracy on the depth anyway. I was able to adjust things "close enough" without too much trouble.

The upside is I only spent $.99 on screws and I was able to make the cuts exactly as I needed them with ease.

I certainly didn't come up with this idea. But the purpose of this post is to encourage thoughtful and frugal use of the tools one has to get the job done. Also, to tease a certain someone about a project I committed to that is currently underway. I'll post more about this project when it's completed and delivered.

Wednesday, April 29, 2009

SSH Tunnels & Proxy Tinkering

A couple months after hacking my Linksys router and upgrading it to use DD-WRT firmware I was reading on the DD-WRT site about SSH tunneling.

In the following post I will document why anybody would want to do this and how I went about doing it (mainly so that I can do it again should the need arise). I used several sources to guide me through the process one step at a time, and unfortunately I don't remember most of the sources so I can't give credit where credit is due. I am not knowledgeable enough to take all the credit for the methods employed in this post. Consider this a consolidation of all the information out there, filtered through my own needs and uses.

What?

SSH allows for secure communication from one computer to another. It's an especially simple way to administer to a linux machine remotely...if you are familiar with the linux shell and commands. When connecting to a remote machine over SSH you can open or assign ports to communicate using this SSH connection. Any communication on these ports is then sent through SSH and is also secure.

Why?

Why the need for security and why use SSH? Because when networked, computers share information like people share air. Anyone with a little know-how can sniff your network traffic and steal all kinds of personal information. Especially when this traffic is wireless. The data is quite literally flying through the air riding on radio waves, available for anybody to intercept. SSH doesn't prevent people from intercepting it, but because it's encrypted it can't be read.

Even if you're not doing this for security, the things that can be done over SSH can add all kinds of convenience. You can basically extend your home or work network to any machine anywhere in the world.

How?

"This all sounds so hard!"

Not at all. After some initial setup it's really quite easy.

Assuming DD-WRT is already installed on the router, enable SSHd and assign a port. I recommend not using the default port 22. Pick something else, but remember what you picked. You'll need that number later when you connect to the router. For simplicity here I'll just use 22.

I set up my router to require public key authentication instead of a password. I did this so that the router can't be cracked by a password attack. An intruder would have to have my private key in order to gain access. The downside is that if I lose my key I lose remote access. I'd still have local access though so I can always create another if necessary. There are many methods for creating a public/private key pair. I used PuTTYgen.

If you don't want to install DD-WRT on your router, but your router is capable of SSH connections then do whatever you need to do to get it setup. Check your router's documentation on how to do this.

Since it's likely that the WAN IP address of the router will change from time to time it's a good idea to setup a dynamic DNS. I covered this at the bottom of my post on DD-WRT tinkering. This makes it easier to SSH to the router without having to know or remember the IP address.

I'm using PuTTY in Windows for SSH sessions. Linux has SSH capabilities built in. If you're using a Mac you're on your own. Nothing against them personally, I just don't own any and don't know how. The following instructions are for Windows (PuTTY) only.

Open PuTTY and start a new session.

Host Name (or IP address):
username@ip address

The username should be whatever username you're going to login as (ie root).
The IP address is the IP address of the router. If you're physically located on a remote network (ie you're at a wireless hotspot) you'll need the WAN IP address of your router, or if you're using dynamic DNS you enter the URL.

Port:
22 (or whatever you set it to above)

Connection type:
SSH


If using private/public key authentication then open Connection -> SSH -> Auth and enter the path to the private key file for authentication.

Save the session and click Open. If using password authentication you'll be prompted to enter your password.

By this time you should be in. The first time connecting you'll be prompted to verify the host key.

We're in but we don't have any tunnels so all you can do at this point is administer the router from the shell. Not entirely useless, but we can do so much more.

Proxy Tunneling

If you have an open SSH session, close it and go back to the saved session (click on the session name and click Load). Go to Connection -> SSH -> Tunnels.

Source port: 5555 (or anything you want)
Select Dynamic and Auto.
Click Add.

"D5555" should appear in the Forwarded ports.
Save the session and Open.

In Firefox install FoxyProxy

In FoxyProxy Options click Add New Proxy.
Proxy Details -> select Manual Proxy Configuration
Host or IP Address: localhost
Port: 5555 (or whatever you picked above)
Select SOCKS proxy, SOCKS v5
Click OK

Under Global Settings check "Use SOCKS proxy for DNS lookups."

Now when you open an SSH connection and forward port 5555 (leave the SSH window open in the background) you can use FoxyProxy to route all Firefox traffic through your router over the SSH connection. Just activate FoxyProxy: usually middle-click the status bar in the lower right corner of the Firefox window until the status reads "FoxyProxy: Default."

Check that it's working by going to whatsmyip.org. Disable FoxyProxy and load the page. You should see an IP address at the top. Make a note of the address, enable FoxyProxy again and refresh the page. The IP address should change. It will be your router's IP address.

When the network traffic is being tunneled through SSH you can surf the web securely no matter how insecure the network might be. You can use free wireless hotspots without fear of a someone snooping on all your internet usage and stealing passwords. But do keep in mind that this proxy type is only good for Firefox. If you switch over to IE or anything else (iTunes, Outlook, etc.) that traffic is not being tunneled and is limited to whatever built-in security there is...if any.

I've heard it's possible to change the Windows internet connection settings to use the forwarded port as a proxy and secure all internet traffic, but I haven't had any success doing so. If any reader has, please feel free to post how you did it in the comments.

With this proxy setup you're essentially browsing the web through your own router. Your IP address will appear as your router's IP. There are many advantages to this, but there is one disadvantage. You're limited to the speed of the remote network and if your ISP has limited bandwidth caps (or more accurately: data transfer caps) this traffic counts too. So keep that in mind. You can even admin the router through the web interface as if on a local network without the need to setup remote administration.

Remote Desktop Tunneling

Back in the Tunnels settings in PuTTY.

Source port: 3390
Destination: xxx.xxx.xxx.xxx:3389
Select Local and Auto
Click Add

xxx.xxx.xxx.xxx = the local IP address of the computer you want to Remote Desktop (ie 192.168.1.100).

Save the session and Open. Leave the SSH session open in the background and open Remote Desktop Connection.

Computer: localhost:3390

Click Connect and you'll be able to remote into the computer from anywhere! No need for complicated VPN or opening ports on the router.

Music sharing with iTunes

You can share your music with iTunes over a local network. You can either let iTunes do the sharing (Edit -> Preferences -> Sharing -> select Share my library on my local network) or you can install an mt-daapd server like Firefly Media Server on a linux machine.

Back when I hacked my router I also hacked a NSLU2 device and installed Firefly Media Server to share music on my network. When I open iTunes on any networked computer I can get access to the library of music being shared on the NSLU2 ("slug"). With SSH, port tunneling, and an application called RendezvousProxy you can be listening to your music collection from anywhere.

Back to the Tunnels in PuTTY

Source port: 3689
Destination: xxx.xxx.xxx.xxx:3689
Select Local and Auto
Click Add

xxx.xxx.xxx.xxx = the local IP address of the computer sharing the iTunes library (ie 192.168.1.100)


Save the session and Open. Leave the SSH session open in the background and install RendezvousProxy.

Add a new host.

IP Address: 127.0.0.1
Port: 3689
Host Label: (whatever name you want)
Service Text: daap
Service Type: _daap._tcp. (iTunes Host)

Click Add and leave RendezvousProxy running.

Open iTunes. You should see the name of the host (the name you gave it above) available under "SHARED" with the entire library at your disposal.

If anybody has other cool and useful uses for SSH port tunneling please share here in comments.

Saturday, March 28, 2009

Linksys & DD-WRT Tinkering

I actually performed this upgrade quite a while ago. Just trying to play catch-up with some documentation.

In this post I cover installation, general setup, OpenDNS, and Dynamic DNS.

DD-WRT is a free firmware upgrade for most consumer routers. It adds a great deal of functionality and control to your router that otherwise might not be available.

I was in need of a wireless router and knew I wanted to put DD-WRT on it, so I bought a Linksys WRT54GL - reported to be the most compatible and easiest to upgrade. And indeed it is.

Installation

Following the instructions on the install page for WRT54GL I was able to flash the firmware without any problems and had a new, stable, and better router. (Each router install is different depending on the model. Instructions for other routers can be found here.)

After I had been using it for a few months a new version was released so I performed an upgrade to v24-sp1. The following setup instructions are specific to v24-sp1.

Setup

When making changes in the setup I found that it works best if, after making all the changes needed on a page, click the Save button, then click the Apply Settings button. If you don't click on the Save button then the changes made will be lost if you change pages. And I have run into problems of the router hanging and not responding if I click on Apply Settings before clicking on Save. (In these cases the router continues to function but doesn't respond to the web interface, even days later. Only a reboot snaps it out of this state.)

Some of the changes I made to the router setup are as follows (your needs may vary):

Administration - Management
Obviously, the first thing to do is change the default password.

Wireless - Basic Settings
Wireless mode - AP
Wireless network mode - mixed
Wireless Network Name (SSID) - (change this, don't leave it as default)

I had originally set Wireless SSID broadcast to Disable (for additional security), but our Wii game console can't find wireless networks that aren't broadcasting the SSID, so I had to change it back to Enable.

Wireless - Wireless Security
Security mode - WPA Personal
WPA Algorithms - TKIP
WPA Shared Key - ************* (Right - like I'm giving this out, but be sure to set it and remember it. If you forget it then you can unmask it.)

Wireless - Advanced Settings
The TX power can be changed here. It's default is 70 and I left it there. But it can be boosted for better performance if necessary. The older version used to recommend a max, but I can't remember what it was. 100 I think. But it can be cranked up to 251mW which is probably not a good idea.

Services - Services

DHCP Server
The router has a built in DHCP server, but in addition to leasing dynamic IPs I wanted it to lease static IPs to the known computers on the network. I looked up each computer's MAC address under Status - LAN and assigned each one a static IP address. This way each computer can continue to use DHCP (for easier setup) but use a static IP so I can find them on the network.

DNSMasq
DNSMasq - Enable
Local DNS - Enable
Additional DNSMasq Options: strict-order

These settings are for use with OpenDNS. See below.

RFlow / MACupd
This service is for use with RFlow Collector. I've got a Windows server setup with RFlow Collector that I can use to monitor network and internet traffic. Yes, I snoop on my own network. I do this mainly because I can (like most things I do) and because I'm curious. Also partially because if I experience network problems it's another place to look when troubleshooting.

RFlow - Enable
Server IP - (enter server IP here)
Port - 2055 (default)
MACupd - Enable
Server IP - (same as above)
Port - 2056 (default)
Interface - LAN & WLAN
Interval - 10

On the server side I had to setup MySQL and RFlow Collector. Instructions here.

To view the logs I created a Microsoft Access front-end that imports the data from the MySQL tables (shared over an ODBC link) with queries that help to make sense out of it.

Secure Shell
I want to be able to SSH into the router. This is for a variety of reasons: troubleshooting, remote network access, etc. With a dynamic DNS service (more on that later) I could SSH from anywhere in the world with internet access.

SSHd - enable
SSH TCP Forwarding - Disable
Password Login - Disable
Port - (changed) I did not leave these as the default 22 for security reasons
Authorized Keys - (enter public key here)

A few notes: I used public key authentication instead of password authentication here. Again, for security reasons. Without password authentication the router can't be hacked by guessing the password. The one disadvantage is that without my private key, I can't get into it either. More information on this and how to setup public/private key pairs can be found here.

NAT/QoS - Portforwarding
I have a webserver (that I'm really not doing anything noteworthy with at the moment, but have plans) so I use portforwarding to make the webserver visible to the internet.

Application - webserver
Port from - 80
Protocol - Both
IP Address - (IP address of webserver)
Port to - 80
Enable - check

OpenDNS

In order to filter internet content and be somewhat in control of what my kids have access to on the internet, I decided to use OpenDNS for DNS service instead of the default DNS my ISP provides.

After creating an OpenDNS account I made the following setup changes:

Setup - Basic Setup
Static DNS 1 - 208.67.222.222
Static DNS 2 - 208.67.220.220
Use DNSMasq for DHCP - check
Use DNSMasq for DNS - check
DHCP-Authoritative - check

To plug one of the holes used to get around these DNS filters I added the following command to the firewall:
Administration - Commands
Firewall
iptables -t nat -A PREROUTING -p udp -i br0 --dport 53 -j DNAT --to $(nvram get lan_ipaddr)
iptables -t nat -A PREROUTING -p tcp -i br0 --dport 53 -j DNAT --to $(nvram get lan_ipaddr)

In order to take full advantage of OpenDNS's filter capabilities, the router's WAN IP address needs to be registered with the OpenDNS account. But if the IP address changes (which is likely to happen with most ISPs) then the filter won't work. OpenDNS has a client-side application you can run on your computer that auto-updates the IP address with OpenDNS, or you can take advantage of the built-in functions of DD-WRT to do the same thing. See below.

Dynamic DNS

In addition to updating my dynamic IP address with OpenDNS, I wanted to have a human usable domain name to see my webserver or SSH to my router whenever I'm away from the network. So I need a domain name and a dynamic DNS service to keep track of my IP address.

First I registered a domain name with DynDNS (it's free). DD-WRT has the ability to interface with DynDNS and auto-update my IP address with them directly, but I also needed to register my IP with OpenDNS. The router can't manage both at the same time.

That's where DNS-O-Matic comes in, an awesome service, also provided by OpenDNS, that can update your dynamic IP with several dynamic DNS providers. After setting up my DNS-O-Matic account to forward my IP to both OpenDNS and DynDNS, I just need to setup the router for the one service.

Following the instructions from DNS-O-Matic:

Setup - DDNS
DDNS Service - Custom
DYNDNS Server - updates.dnsomatic.com
Username - (enter username)
Password - (enter password)
Hostname - all.dnsomatic.com
URL - /nic/update?
Force Update Interval - 10 (default)

Conclusion

DD-WRT has so much more functionality that I'm not using. It's a very interesting and exciting platform to play around with.

Sunday, March 22, 2009

Setting Up Shop

I received Setting Up Shop by Sandor Nagyszalanczy as a gift from my parents recently. I've been wanting to do a complete overhaul of my garage workshop since we moved here, but just never got to it. So I decided recently that this was the year I was going to try to make it happen. Since I'm only in the "dreaming" stage of the project right now, this was a very timely gift.

It's a great book for anyone in the planning stages of a workshop or just trying to get the best use out of an existing shop. Don't expect to find detailed plans and layouts though. It keeps ideas and plans general to be flexible to everyone's needs, budget, and workspace. It also covers pretty much every aspect of workshop design. While it's geared more toward a woodshop, many of the concepts could be applied to any kind of shop.

It has chapters on where to build a shop, construction, electrical, heating, equipment, layout, work areas, storage, dust collection, and safety. Each chapter is full of a variety of pictures that give great ideas on shop organization and construction for any shop, small or large. It covers everything from space saving tips for those working in a one-car garage to central dust collection for large pro shops. There are even charts for helping size equipment or design circuits.

I thought I knew enough from my own experience to take on this workshop redo without a problem, and I probably would have been okay. But this book has really helped fill in a few gaps and got me thinking about other ways of doing things that will really help me to make my future workshop even better. Thanks Mom & Dad!

Monday, March 16, 2009

Streaming Webcam Tinkering

Last Friday a friend showed me his chicken-cam. He got a wireless IP webcam and mounted it looking down into his chicken coop (currently just baby chicks in an indoor cage). That got me thinking (and something to do over the weekend). I had an unused PC sitting around that already had Ubuntu installed on it, and an old but decent webcam that I hardly use. I figured it wouldn't be too hard to put them both together and get some streaming video up and running. We've got some cockatiels sitting on some eggs right now. I could mount the camera there.

I had to make a trip into Portland on Saturday for a coin show (for David's coin collecting merit badge) and I was right next to Free Geek so I made a stop there to visit the thrift store. I picked up a couple USB webcams ($3 each) so I could use those instead of the better one I already have. These will be going into or on a bird cage and I'm not sure how well I'll be able to protect them...if you know what I mean. (I also picked up a 250GB drive for my Windows server for just $35, but that's not related.)

Stage 1: Getting the camera working in Ubuntu

Piece of cake. I plugged it in to the USB port. Done. Well, I actually did install some software just to make sure it worked.
   sudo apt-get install camorama

Camorama is just a simple webcam viewer. That's really all it does.

Stage 2: Install a webserver
   sudo apt-get install apache2 php5

I don't really have need of the PHP right now. I'm just slapping together some HTML pages to get things going. So, webserver...done.

Stage 3: Install Motion

Motion is a webcam application for linux that turns a simple webcam into a motion activated security camera. When it detects motion it will save still images and video to the hard drive for later viewing. It can be setup to take intermittent still shots. It will do timelapse videos. It even has a built in webserver for streaming video. Installing this was also a piece of cake in Ubuntu. I guess it's popular enough that it's available in the Ubuntu repositories.
   sudo apt-get install motion

Some minor modifications to the configuration files was needed. (Config files located in /etc/motion) The following changes were made, everything else was left as default. Explanations of each setting are giving in the config file. I set it up to run with 2 webcams.

motion.conf
   daemon on
framerate 2
max_mpeg_time 600
output_normal best
output_motion off
ffmpeg_cap_new on
ffmpeg_timelapse 60
ffmpeg_video_codec msmpeg4
snapshot_interval 60
target_dir /var/www/motion
webcam_port 8081
webcam_localhost off
control_port 8080
thread /etc/motion/thread1.conf
thread /etc/motion/thread2.conf

thread1.conf
   videodevice /dev/video0
text_left CAMERA 1
target_dir /var/www/motion/cam1
webcam_port 8081

thread2.conf
   videodevice /dev/video1
text_left CAMERA 2
target_dir /var/www/motion/cam2
webcam_port 8082

Running motion:

sudo motion -n

The -n option forces it into non-daemon mode (where it doesn't release the console so I can turn if off easier). I'll set it up to run automatically in the background once I get it setup exactly where I want it.

At this point I just started goofing around with it and having fun playing with the motion capture portion. Basically acting like a 13-year-old with some "spy" toys.

Once everybody was sick of me and I had had my fun it was time to move on to...

Stage 4: Get it streaming

The harder part.

It took some scouring of the web and looking at the code behind some example web pages to get this going. But with a little trial and error things worked out with less effort than I thought it was going to take.

I actually did get it streaming right away after installing Motion. But it didn't work quite right on Firefox (my browser of choice) and it wasn't embedded into a webpage the way I wanted it to. There was also no way it was going to be accessible outside my network without poking a bunch of holes in my firewall. No thanks. So I had to find another way. Other people were doing it. I figured it couldn't be all that hard.

Stage 4a: Installing a Java applet to make a clean and embedded stream.

The creator of Motion recommended Cambozola. I was thrown off by the install. It just involved a simple "move this directory to where you want it." Not what I was expecting, but it worked. I moved the whole thing to my /var/www directory.

The following code gets a nice looking stream onto a web page.

<applet code=com.charliemouse.cambozola.Viewer
archive=/cambozola-0.70/dist/cambozola6.jar
width=325 height=245
style="border-width:1 border-color:gray; border-style:solid;">
<param name="url" value="127.0.0.1:8081">
</applet>

Stage 4b: Get it working outside the network

The problem with the above code is that end value "127.0.0.1:8081". Any computer that is not the computer running Motion won't find anything at that address. I could change the address to the IP of the computer running Motion but then it only works inside my network. If I want to see the stream from anywhere outside my network I had to find another way.

Fortunately, the creator of Motion also made a nice little app that proxies the Motion webserver. MjpegProxyGrab. This install was very easy. Just follow the instructions on that page.

One mistake I made was not knowing where my cgi-bin was. I thought I could just make a cgi-bin in the /var/www directory. But when I tried viewing the web page I just got an error that the application couldn't be found. I dug through the server error log (/var/log/apache2/error.log) and found that it was looking in the wrong place. Instead of trying to redirect everything to the cgi-bin that I put in the wrong place I just moved the apps to the right bin in /usr/lib/cgi-bin. After that things were working perfectly. Use the new code to embed in a web page.

<applet code=com.charliemouse.cambozola.Viewer
archive=/cambozola-0.70/dist/cambozola6.jar
width=325 height=245
style="border-width:1 border-color:gray; border-style:solid;">
<param name="url" value="/cgi-bin/nph-mjprox?1">
</applet>

I do still need to figure out how to get the digital certificate warning to go away though.

Stage 5: Locate cameras and begin streaming

Actually, this stage is yet to come. I don't want to make too many changes to the nest right now while the birds are still tending the eggs. We don't want them to panic and abandon them. So I'm going to do this part later. Maybe after the eggs hatch. Meanwhile, I've got to find some other use for this new toy. Maybe we'll also do a butterfly-cam soon.

I also verified that the cameras can see infrared (I just pointed a TV remote control at the camera and could see the light emitted by the IR LEDs), so I plan to make a ring of IR LEDs to go around the lenses of the cameras for night viewing inside the bird nest. I just need to verify that cockatiels don't see infrared so they won't be disturbed by it.

Saturday, February 21, 2009

Arcade Tinkering

Technical content ahead. This is going to be one of those super geeky posts where most people may not follow. Remember, I'm documenting my projects in case I need to revisit them in the future and do things over again or figure out how I did it in the first place. Or maybe someone out there is going through the same thing and is doing research of their own. This post is also very long. You have been warned.


A couple of years ago I built an arcade cabinet. It was a very fun project. I had been researching everything I wanted to build into it for a few years before I began. I was just waiting for the day when I had both the money and the time to build it. It took a little while to complete mainly due to weather (you can't laminate below 60 degrees) but I finally completed it and we've been having lots of fun with it.

Or was it complete? In order to simplify the first install and get things running to thoroughly test the hardware, I installed Windows XP on it and was running Mame32 for arcade emulation. But I was really never happy with that setup. It worked okay. No problems with game play or emulation. But I hated having Windows on it. Now, I'm not anti-Microsoft at all. But the computer I installed in the arcade is older hardware and Windows XP is a bit of a hog. It also requires quite a bit of maintenance just to keep it virus free. And since I've got it hooked up to my network, for security's sake it needs constant updates. Startup times are very poor. From zero to ready-to-play takes 7 minutes, 40 seconds. And that's if there are no updates to apply. It really takes the fun out of playing a quick game of Galaga when you have to turn it on and walk away for 10 minutes waiting for the dinosaur to wake.

Ever since day 1 I've been wanting to use Linux instead. So a few weeks ago I finally decided to just go for it. And this redo took quite a bit of tinkering indeed. Lots of trial and almost an equal amount of error. But after much CD burning, Googling, head scratching, and hacking away I have got it working in much better condition.

(I didn't want to completely lose my Windows install in case things didn't work out with Linux and I wanted to go back to the original setup, so I just swapped hard drives with a spare I had laying around. The old one is standing by if things go wrong.)

Problem #1: Which Linux distribution do I want to use?

One of the great (and sometimes confusing) things about Linux is the availability of a variety of distributions (or distros). Each one is unique in their own way and ultimately caters to a different audience. I've used Ubuntu and Debian before and really like them (Ubuntu is built off Debian). So both of those were a definite option I wanted to try out. I also wanted to give Lincade a try. It's a Linux distro (built off Gentoo) built specifically for arcade emulation, with support for the unique type of arcade hardware I had installed in my cabinet.

Linux pros: Stable. Secure, unlikely to get viruses or other malicious software. Very customizable. Runs great on older hardware without much overhead (faster boot times).

Linux cons: Harder to use than Windows.

When it comes to desktop computing, Linux has come a long way. Distros like Ubuntu and Debian are very easy to install and very easy to use for your regular desktop use. But for non-regular use it's not a simple plug-and-play solution.

One of the big roadblocks I could see ahead of me was the fact that I was using non-standard hardware in my cabinet. Non-standard for a computer desktop that is. I have a monitor built specifically for arcade use. Many arcade games use low resolution graphics and slow scan rates that regular computer monitors cause to appear fuzzy. I wanted sharp, accurate reproduction of the games. Since Windows is a more popular platform there were utilities available for such monitors. But there wasn't anything to my knowledge for Linux.

Since Lincade is supposed to have been built specifically for uses such as mine I was hoping it would be the solution I was looking for.

Problem #2: Faulty USB hub.

While trying to install Lincade I was getting the following error.

hub 1-0:1.0: connect-debounce failed, port 1 disabled


After unplugging the USB hub (a necessary component to use the arcade control panel, trackball, and spinner) I was finally able to complete the installation. I wasn't sure if it was really a USB error or just something wrong with Lincade. So I gave Xubuntu (a variation of Ubuntu) a try.

Xubuntu installed without error, but it wasn't recognizing the trackball (my only current option for a mouse). That's no good. Time to try Debian.

Debian installed perfectly too, but also wasn't recognizing the trackball.

This time I swapped out the USB hub for another I had around and reinstalled Xubuntu. Installed fine, I had a working trackball. Must have been something weird about that hub. Windows doesn't seem to have a problem with it (as I'm using it now with my main office computer running Windows), but Linux just doesn't seem to like it.

During the troubleshooting of the USB hub I tried flashing the computer BIOS thinking that might solve the problem and during that process I discovered...

Problem #3: Dead floppy drive

Or it might be a dead floppy drive cable...or both. Xubuntu had given me the following (occasional) error during install:

Buffer I/O error on device fd0, logical block 0
End request: I/O error, dev fd0, sector 0


In Linux, "dev fd0" is the floppy drive ("device floppy drive zero"). So once I had flashed the BIOS (by temporarily putting in a floppy drive from another computer) I didn't need it anymore and just unplugged it and disabled it in the BIOS.

No more error.

I decided to give Lincade another try and reinstalled it. Unfortunately it doesn't have the slick graphical interface that Ubuntu and Debian have which makes it harder to use. Also, it requires you to boot into a "PC-mode" in order to setup certain options. The PC-mode doesn't display on my main arcade monitor though and requires me to setup a secondary monitor. That's a big pain. So, thinking I'm just going to completely give up on what I thought would be my best option...I set Lincade aside and went back to Xubuntu.

Problem #4: It's a pain in the %#$ to install a MAME emulator in Linux!

I could not for the life of me get this thing working. I did successfully install XMAME and sort of got it working from a command line. But it's no fun having to type "xmame galaga" or "xmame tmnt" or "xmame pacman" every time I (or the kids) want to play a game. That's no easy-to-use option. And the graphics weren't right either. There are frontends available to use so I tried installing WahCade. There's a deb file available for that which I downloaded and tried installing. But for some reason it didn't install all the dependencies. It wasn't until after I installed a totally seperate mp3 player (Rhythmbox...love it) that the dependencies for WahCade got installed.

(Quick Linux for newbies Lesson #1: There's no such thing as a simple "installer" in Linux like there is in Windows...at least not exactly the same thing. You can't just download an executable, run it, and have everything magically install. Sometimes you have to download the source code and compile it. Which wouldn't really be all that bad if the source code doesn't depend on other packages to be installed...which it usually does. Then it's a huge pain trying to track down all the missing packages and compile and install those...and in the proper order...while standing on your head, crossing your eyes, and holding incense in your toes. Fortunately, Debian (and Ubuntu as well) has a package manager called Aptitude that can make installing common packages a breeze. You do have to know the name of the package though, and that's where Google really comes in handy. Just type in the command line (as root):

apt-get install rhythmbox


and you've just installed a fully functioning iTunes clone. Very easy. There are also "deb" files available for Debian and Ubuntu that almost behave like simple installers and are supposed to eliminate the need to satisfy dependencies. Some other Linux distros have their own package managers as well.)


Once I satisfied the WahCade dependencies it seemed to work a little, but I couldn't get it to behave properly for my arcade monitor. Xubuntu wanted to ignore the xorg.conf file and for some reason in Debian the image just squished down.

(Quick Linux for newbies Lesson #2: The graphical display environment in Linux (called "X") is handled by the X server. An important file for configuring the X server is the xorg.conf file located in the /etc/X11 directory. This handles things like the graphics driver, the monitor resolutions available, etc. I really only understand enough to get me in trouble...and sometimes get myself out of trouble.)

I tried to also install AdvanceMame with the AdvanceMenu frontend. That was completely useless. There was no deb file available for that and I couldn't satisfy the dependencies to get it to compile correctly. Too many vague requirements for framebuffer support or SDL libraries. The installation documentation was completely useless. It was a bigger pain than WahCade.

By this point I had spent a good 3 days on the project and had installed Lincade 3 times, Xubuntu 3 or 4 times (I lost count), and Debian something like 5 or 6 (hundred?) times. I was beginning to get fed up and was almost ready to throw in the towel. But that's not me, and I decided to give it a day's rest and see if I can't come to some solution after separating myself from the problem and giving it more thought (see Tinkering Tip #1).

While I was "not thinking about it" I came upon the realization that even though Lincade was lacking the main feature that I was trying to get out of Ubuntu and Debian (an easy to use GUI) I figured that since it can easily handle the hardest parts (installing the correct monitor support and emulation software) I could probably just work around the rest and get it all worked out. It turns out that this was ultimately the easiest solution.

With the previous hardware issues already worked out I forged ahead with one more Lincade install. Everything installed fine. It turns out the PC-mode may not be so bad afterall as I only need to use it for the first time configuration. Everything after that I can modify in Cabinet-mode without having to use a secondary PC monitor.

PC-mode has the option to copy ROMS from a CD or a USB stick. I didn't want to waste burning a CD (and all my ROMS wouldn't fit on one CD anyway), so I just copied them to a USB stick I had. I don't like this option much just because it takes so long. The USB port on this computer is 1.1 so it's slow. And I also don't like that the games are automatically copied to the /usr/share/games/advance/roms directory. I wanted them to go into the /home/mame/.advance/roms directory instead.

I have a NAS on my network running Linux and sharing folders with NFS. I already had all my ROMS on the NAS in a shared directory, so instead of using a USB stick or CD to copy files I figured I'd just do it over the network.

First I had to install NFS support in Lincade. (Gentoo has a package manager called Portage. The command to run is "emerge.")

emerge –av nfs-utils


Then mount the NFS directory. ("pippin" is the name of my NAS.)

mount –t nfs pippin:/home /mnt/nfs/pippin/home


Put a line in the /etc/fstab file for auto mounting on boot.

pippin:/home /mnt/nfs/pippin/home nfs rw,sync 0 0


Now I could copy all the files I needed from one folder to another over the network. Much faster and easier to use later on when there are more to add.

But even though I didn't like PC-mode's ROM loading utility, everything else is really nice. The monitor resolution tool is awesome, automatically loading all the modelines you need in xorg.conf. The sound card setup works perfectly. All other setup in PC-mode was a breeze.

Finally things were all setup and I could run the emulator. It comes with AdvanceMame and AdvanceMenu, as well as MESS and DAPHNE. I primarily use MAME and haven't quite found a use for MESS or DAPHNE yet. And the AdvanceMame and Menu work great...once I got the resolutions figured out.

In xorg.conf I had to set the default resolution to 640x480. It first defaults to 480x480 which doesn't work out to any usable resolution so it defaults to some other higher resolution that causes my arcade monitor to flicker and look really bad. After much trial and error I found 640x480 to be the perfect resolution for my setup. Then if the games aren't displayed in the correct size I can change their individual settings within the game menu.

Press Tab to open the menu -> Move down to VIDEO -> change resize to "fractional"

Now the games play in the proper resolution, frame and scan rates, and have the correct size and proportion.

But there were more issues to be fixed still.

Problem #5: Slow trackball movement

The trackball was moving very slowly. This made games like Centipede completely unplayable. At first I thought it was more USB hardware going wonky on me, but it turned out to be an easy fix. In the BIOS I had to enable legacy USB support. I'm not entirely sure why that made a difference but I tried it on a hunch and it worked.

Problem #6: The spinner wasn't working

Well, actually it worked, but not in the games. I verified that it works because just before the AdvanceMenu comes up there's an "X" cursor that I could indeed move with both the trackball and the spinner. The spinner made it move vertically, just like in Windows. It turns out that AdvanceMame wants it to move horizontally for games that use the spinner. I couldn't figure out any way to switch the Y-axis to the X-axis in the software. But after much more Googling I learned that there's a jumper on the spinner that switches the axis.

So I opened up the control panel (good thing I made this relatively easy to do) and sure enough there's a jumper with one side marked "H" and the other side marked...we'll I actually don't know because I couldn't read it, but I'm going to assume it was marked with a "V" and that's the side that had the jumper. So I moved it to the "H" side and started the computer back up again. And, the spinner works now.

While I was doing some digging around in the documentation directories installed by the Lincade CD I found that some of the documents are HTML formated. So I figured it would be a really easy thing to just install Apache and make this thing into a webserver so I can more easily read the documentation. I've already got SSH running on it (it comes that way "out of the box"). Why not take it one step further?

emerge -av apache
/etc/init.d/apache2 start
rc-update add apache2 default


Problem #7: The font size in AdvanceMenu was too small to read

This was easily fixed (although difficult to figure out) by adding a line to the advmenu.rc file.

ui_fontsize 30


The number indicates how many rows of text to use for the font. The smaller the number, the bigger the font. I found 30 rows to be just right on my 27" monitor at 640x480.

Even though it's now playable and works great I'm sure I'm still not done with it. This is going to be one of those on-going projects that I return to again and again to make a few tweaks and changes now and then. For example, I'd like to make a few personalized modifications to the AdvanceMenu front end.

Since I had several hardware issues during these changes I'm a little worried about the longevity of this computer. I'd like to change it out sometime soon. I don't need a high-end model since it's only running really old arcade games. I just need a computer that can last longer. Also, the special Arcade VGA graphics card I have installed requires an AGP port, which isn't a standard option on newer computers. Ideally the computer I replace it with will also be silent (so I don't hear fans running inside the cabinet) and maybe use a solid-state drive for even faster boot times.

Conclusion

It took a lot of work and a great deal of frustration (which I actually enjoy on projects like this). I learned a lot more through the process and got things working even smoother. I'm pretty sure that when the computer is replaced that I can do the reinstall even easier and faster than this one took.

The new boot time, from zero to ready-to-play has been reduced to 1 minute, 32 seconds. (And that includes a built-in 5 second delay in the Grub menu.) It's not "instant on" but it's pretty good. A faster hard drive will improve that as well.

Relevant Hardware Specs

Betson Monitor 44-4070-RT
Arcade VGA
Tornado Spinner (USB)
Trackball
Opti-Pac (USB)
I-Pac (USB)

Most Helpful Online Resources

http://www.pc2jamma.org/
http://advancemame.sourceforge.net/doc-advmenu.html
http://en.gentoo-wiki.com/wiki/NFS/Client
http://beans.seartipy.com/2006/04/18/apache-php-mysql-on-gentoo/

Thursday, February 19, 2009

Tinkering Tip #1

If you get stuck and are feeling frustrated, walk away.

No, don't give up. Just do something else for a little while and take your mind off of it. I'm always surprised at how taking my mind off the problem will actually help to come up with new and creative solutions.

Thursday, February 12, 2009

Why DIY? - Part 5 - Making Connections

Things are little slow right now on the tinkering front. So during this period of downtime I'm going to spend the next few posts exploring the "whys" and the "what fors" of tinkering around.

When I was in high school I hated studying history. It seemed like nothing but a bunch of dates and places involving people and events I just didn't understand. Even though I knew the concept of "those who don't understand history are doomed to repeat it," it still seemed irrelevant. I suffered through it each day and dreaded every homework assignment.

It didn't get much better in college. In fact, it only got worse when I had a teacher that gave the most boring lectures, only to be out-bored by the boringest text to ever bore (authored by this very same teacher of course). The only class in which I ever received an F. It was a much deserved F too. You should have read my 300 word essay on the final exam. We were supposed to have written it on how ancient Egypt has influenced other cultures, but instead I wrote an eloquent diatribe on how awful the class, text, teacher, and test was. Oh, it was a thing of beauty.

Of course I couldn't graduate with that F on my record so I was forced to retake. This time I took it during an "off" semester where the class size was sure to be smaller and I could hope to get more out of it. I was very fortunate the second time to get a teacher who made the subject of history very interesting to me. Instead of treating history like a bunch of dates and moving through the time line like a snail in molasses, he would address a single subject in each lecture and cover the entire time line of that subject in a "big picture" fashion. Women in history, technology in history, etc. This really worked for me and opened up an all new appreciation for the subject. I actually enjoyed the class and the homework and earned a B. The highest history grade I ever earned.

And now I find myself interested in the past and those who have gone before me. I like to learn about how things used to be and how far things have come. I've even found it fun to try to do some things the "old fashioned way." Making home made bread, pickles, outdoor cooking, etc. I know others who sew, quilt, bake, and garden just like in "olden" days. I often feel like tinkering helps me to make a connection to the past. As if showing an interest in the things my ancestors were interested in could help me to feel like they were real instead of just a picture in an album. Or sometimes while I'm tinkering around with technology unavailable to them at the time I wonder if they would have been interested in it too and how well they would have enjoyed tinkering with it.

I usually try to prioritize the projects that are appropriate and fun for the kids to help me with. This gives me an opportunity to spend time with them instead of just holing away and missing out on their lives. It also allows for me to share some of my interests with them and hopefully get them interested too. I can also learn more about the things they are interested in and try to incorporate their interests in the project with an effort to help bring out their talents. In this way I can also make connections with them.

Perhaps Malachi was speaking of tinkering and the DIY movement when he said, "And he shall turn the heart of the fathers to the children, and the heart of the children to their fathers, lest I come and smite the earth with a curse. " (Malachi 4:6)

Tinkering is a great opportunity to turn the heart of the fathers to the children and the heart of the children to the fathers as we share in one another's hobbies and pass on those interests from generation to generation. And a non-industrious society, only consuming and not producing would indeed be a curse on the earth.

Part 1 - Fun!
Part 2 - Economics
Part 3 - Reduce, Reuse, Recycle
Part 4 - Education

Sunday, February 1, 2009

Why DIY? - Part 4 - Education

Things are little slow right now on the tinkering front. So during this period of downtime I'm going to spend the next few posts exploring the "whys" and the "what fors" of tinkering around.

I enjoy a good mind bender. Anything that challenges me and forces me to put my brain into overdrive. I'll even spend a great deal more time than I probably should on such things and even if I get nowhere I'll still feel like I accomplished something. And this is because during these times I'm researching and educating myself on the subject. Sometimes picking up a few tangential bits of knowledge as I go that I hadn't intended on discovering.

As a tinkerer I'm often up against such challenges. Most, if not all, projects I take on I have no previous knowledge or experience and I need to train and educate myself on how to succeed at the task. And being a bit of a perfectionist too I'll spend a lot of time upfront researching how others have done it and the things they learned through the process. Much of this research is just to see what I'm up against and exactly how much work I'm setting myself up for. But at the same time I'm slowly building up enough knowledge to feel like I can take it on and feel like I know what I'm doing, even if I'm not an expert.

My favorite thing about college was learning. In fact, the greatest thing I learned in college was learning how much I don't know. It seemed that the more I discovered, the more I studied, the more my eyes were opened to the vast amounts of knowledge still out there for the learning. Tinkering and taking on DIY projects gives me the opportunity to once again tap into some of that knowledge. To continue to further my education even if it's not in a formal manner. These hands-on labs can teach us more than just studying a book. The book knowledge can give us a starting point, but trying things out for ourselves really drives the lesson home. Even mistakes can be good teachers too. Nothing can teach us more about the need of resisters in a circuit than plugging a 3V LED directly into a 9V battery and watching it burn out in a blaze of glory.

Part 1 - Fun!
Part 2 - Economics
Part 3 - Reduce, Reuse, Recycle
Part 5 - Making Connections

Wednesday, January 21, 2009

Why DIY? - Part 3 - Reduce, Reuse, Recycle

Things are little slow right now on the tinkering front. So during this period of downtime I'm going to spend the next few posts exploring the "whys" and the "what fors" of tinkering around.

As technology continues to improve, get cheaper, and ultimately become more popular the older technology gets pushed aside and tends to find its way into our landfills. Some of it just stops working, but much of it is just old and outdated even if it's still perfectly usable. Obviously the best option for dead electronics is to send it to a reputable recycling center (not the ones that just ship the junk to China to poison them, but the good ones that really recycle it).

But some of this e-waste can also be reused or repurposed. The hacker community is filled with people who take apart old electronics and reuse them in new and interesting ways. Turn a dead low energy light bulb into a short wave radio. Convert your old and tired laptop into a digital photo frame (a project I've been trying to get underway). Old Macintosh computers into fish bowls. Turn an old XBox into a home media server. Older (but not super old) computers may not be able to run Windows, but Linux is making it possible to continue to use such computers with a modern and stable operating system. Many people have given new life to dead printers or scanners when they turn them into robots or even 3-D printers.

Some people have saved up more electronic junk than they know what to do with, but also may be short on other things they need to complete a project. In comes The Great Internet Migratory Box of Electronics Junk to save the day.

And that's just electronics. There are many great uses for scrap wood, metal, plumbing, old clothing, or even drier lint. I've got a used cookie tin and a metal paperclip box just waiting to be used in some future project. With a bit of imagination and creativity junk can be turned into treasure. This is good for the environment and good on your wallet.

Part 1 - Fun!
Part 2 - Economics
Part 4 - Education
Part 5 - Making Connections