Sunday, May 1, 2011

Chicken Coop - Part 3

Part 1
Part 2


It's done! Well, I guess it will never really be done. "It will continue to grow as long as there is imagination left in the world." (Or is that Disneyland?)

First some pictures of the chickens, then a video tour of the coop.


The head chicken in the pecking order is Eve, a Gold Laced Wyandotte.


The "1st lieutenant" is Pox, a California White.


The "2nd lieutenant" is Omelette, a Black Australorp.

The rest are in no particular order:


Skittles, a White Crested Black Polish.


June, an Easter Egger. She'll lay bluish green eggs.


Clover, a Welsummer.


And last (but always wants to be first), Dumpling, an Ancona.


Video Link

Sunday, April 10, 2011

Chicken Coop - Part 2

If you missed it, here's part 1.

More work completed on the chicken coop.

These photos were taken just after I finished all the hen house siding and wire (1/2" hardware cloth). We brought out some of the chickens to let them play outside for a while. Since there still wasn't a door I temporarily attached the lid from the brooder.


One week later - I finished the chicken run door, hen house door, nest box, and pop door. The chickens are in these pictures too, but are not living there yet. It's not quite finished and not ready for them to move in. So we let them out to play for a few hours each day.


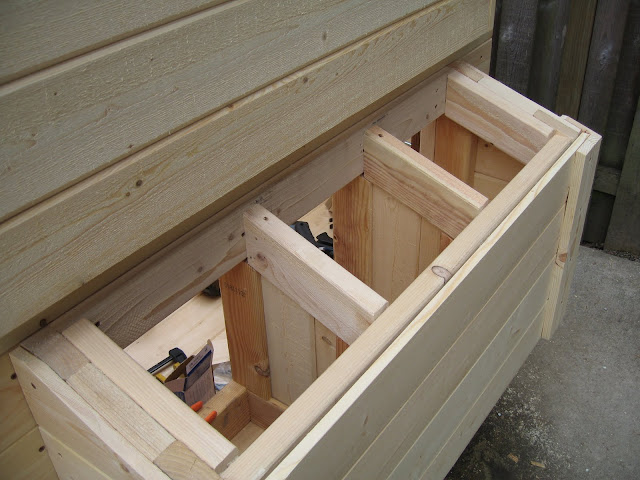
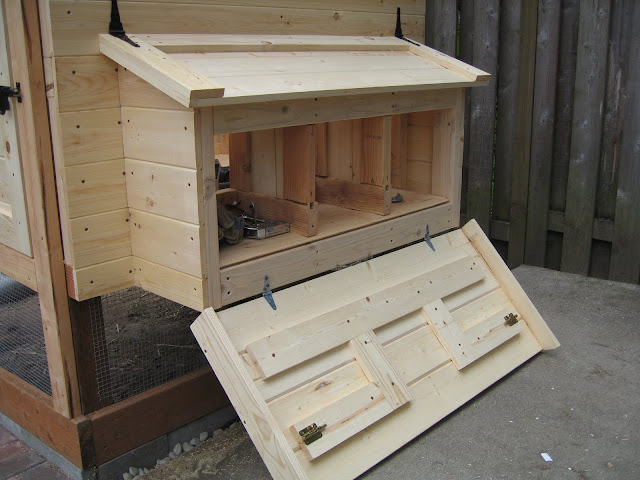
The nest box lid opens up for easy access to collect the eggs.


The side opens down to make for easy clean-out.


The hen house.


I do plan to clean up the tool clutter before the girls move in.


The pop door has a sliding panel. I'll attach a rope that will allow us to lift and secure it from outside the coop. I plan to have it motorized and automated some day, but manual will work for now. The upper-left opening is for the webcam.


A removable panel at the hen house door to hold back the bedding but still give us easy access to clean out the floor.


Some of the girls, out and about.


The last bit of work before the hens can move in is:
  1. Finish the trim
  2. Build ramp
  3. Stain
  4. Install windows
  5. Install roosts

Once they move in I can then :
  1. Install electrical (lights, etc)
  2. Install webcam


Go on to Part 3 - Complete
Part 4 - Update

Thursday, March 31, 2011

Chicken Coop - Part 1

(Edit 1/8/14 - Wow! I just noticed a major spike in traffic to this blog post coming from a couple homesteading and prepping sites. Very cool! Welcome all!

I get a lot of questions about plans and construction details, so after you look over the pictures in this 4-part series please take a look at the following video for more build info: Chicken Coop Construction Info. One of the referring sites implies that this is an inexpensive coop, which is really funny to me. It was actually quite expensive to build...close to $2000. Hardware cloth ain't cheap. But maybe you can get some ideas for a coop that can be built for less.

If you're into beekeeping feel free to check out my other Youtube channel The Bee Vlog. - Bill)

The chicken coop has been under construction for just over a month now but work has been going very slowly due to lots and lots of rain, and my busy work schedule. But here's how it looks as of today. (The cross bracing is temporary and will come down when I install the siding.)


The inspiration for the design of this coop came from the Wichita Cabin Coop. I'm making several design changes, but the overall concept is the same.

The order of construction went:
  1. Set posts
  2. Build roof (clear Suntuf panels)
  3. Bury border pavers (to block digging predators)
  4. Install base boards
  5. Install brick patio (so sick of the rain and mud - I needed somewhere dry and firm to stand)
  6. Lay 1/2" hardware cloth around other 3 edges (also to prevent digging) and spread river rock
  7. Frame the hen house and nest box
  8. Begin siding and floor (present state)


I'll be installing a webcam in the middle hole in the wall. It pivots so we can get a view inside the hen house and outside in the chicken run.

Next -
Part 2
Part 3 - Complete
Part 4 - Update

Sunday, March 13, 2011

Balloon 2.0 Begins

I'm building a new high altitude balloon payload and doing things differently this time. In my previous "hi-ball" adventure I followed the design plans and ideas of L. Paul Verhage, an experienced ballooner. But I failed to recover the payload due to a couple flaws in the design (or implementation of the design). I don't blame Paul. His book is extremely helpful and contains a wealth of information for anyone interested in the hobby. In my next effort I will continue to use his book as a resource.

However, having learned a few things from our first attempt I'm going to make a few changes. Changes to my design approach and changes to the on-board electronics.

First, the on-board electronics. I'm going to use an Arduino for sensors and data logging. For the sake of brevity I won't go into full detail about the Arduino or even the "fuss" many have over it in the hacker/microcontroller community. Instead I'll direct you to a recent post on Make that covers this topic better than I could. "Why the Arduino Won and Why It’s Here to Stay" by Phillip Torrone.

And if you're really interested, HackADay posted a counterargument titled "How the arduino won? This is how we can kill it" by Caleb Kraft. The replies on both articles are also worth reading through. I don't disagree with Caleb. In fact I'd like to eventually move on to try other microcontrollers as well. But for this project I think the Arduino is a good choice.

I like the Arduino for it's ease of use, cheap price, and huge user support base. The sensors and datalogger I'm using integrate nicely and very easily. And with its ease of use I'm hoping to inspire my kids to also give the Arduino a try. That last part isn't going so well though. Each time I show them my progress they just look at it and say "Oh." Either they just don't care about the build process or they look at all the circuitry and think it's way over their heads and they don't want to bother even trying to understand. I think I'd like to try out the graphical programming environment and see if that gets their interest. Also, I plan to use an Arduino for some automation in our up-coming chicken coop project, which also might catch their interest.

I also have some other plans for the electronics that I'll cover in later posts.

As for the design approach, I'm going to try to be more like the engineer I learned to be instead of simply copying others hoping that I'm understanding things, cutting corners, or doing a lot of guess work. Oh, I wasn't completely un-engineer like in my previous attempt. But there were a lot of unknowns that I simply shrugged my shoulders at and hoped it wouldn't be that big of a deal.

First step: get a baseline.


The container I'm going to use is an insulated shipping container from The Cheesecake Factory. I used some of the electronics destined for the payload to build a simple temperature data logger and put the whole thing into the freezer for 2 hours to see how well it performs without any modification.


From left to right we have:
OpenLog, datalogger from SparkFun (p/n DEV-09530)
OneWire digital temperature sensor from SparkFun (p/n SEN-00245)
9V battery
Arduino Duemilanove

After 2 hours I removed the package, downloaded the data, and charted the results. (Temperature readings are in degrees Celsius.)


The temperature inside the insulated box went from (24C) to the ambient freezer temp (-13C) in just under 2 hours. That is not an acceptable result. The payload will be in flight for over 2 hours in temperatures well below the freezing temp of the batteries (-40C) with an added wind chill. I need to keep the internal temp from reaching the external temp during that time. During the build process I'll be trying various modifications to improve this performance. Hopefully a few of the principles I learned in my heat transfer classes will come back to me and help me out.

Saturday, January 22, 2011

Brain Machine

I can't take naps. I'm capable of it, I just shouldn't. I alway feel worse after and then I have trouble going to sleep at night. But sometimes I really want to. "Just 15 minutes" I say. But 15 minutes always turns into 2 hours and then the rest of the day is ruined. So I just avoid them now.

Then I read about the Brain Machine by Mitch Altman from Make magazine. It caught my attention and I added it to my project list. Since I can't afford to do every project I like I let the list act as my filter. Anything on the list I'm still interested in after a few months gets bumped up the list and as money and time become available they get started. This was exactly how things went for the brain machine.


Make's Maker Shed store has one available for sale, and I was going to buy it there, but when I went to finish the check-out and saw the $14 shipping price I decided to look around to see if somewhere else had a better deal.

And a better deal I found, at Adafruit Industries. Not only was their shipping cheaper ($7), but the kit was priced $5 less too ($30). They also had much better instructions - plenty of pictures and enough detail that even a beginner could easily put this together.

The kit arrived quickly and had everything needed for assembly. Even batteries, shrink tubing, and wire ties. (You'll need to provide your own tools.) I was very impressed. It's these little conveniences that so often get overlooked that I really appreciate.


I may have gone a little crazy with the hot glue.

Assembly was very easy and went smoothly. It took me about 2 hours total, and that includes the time I spent mopping and turning the ribs out in my smoker. I almost made one mistake during assembly that (fortunately) Adafruit's terrific instructions helped me avoid. I had accidentally soldered the wrong color wire onto the negative lead on one of the LEDs. The instructions recommend testing the LEDs before making any final solder joints on to the board. I could have just let my experience fool me into thinking this wasn't necessary, but decided to take the little extra time and effort to test anyway. To my surprise I found this error before I soldered the wires to the board. It wouldn't have been a major error, but I would have wasted a great deal more time. And I hate making such simple mistakes.


The first time I gave them a try I was really surprised at how a couple of blinking lights will produce such wild patterns. Something I didn't expect at all. But all the hype around these things led me to think I'd have a more meditative "transcendent" experience. I actually spent most of the time feeling like I was going to go blind from the bright lights. And yes, I had my eyes closed. The lights were just too bright for my comfort. I tried it a couple times with the same results. Lots of cool patterns, but disappointment overall.

So I put a piece of masking tape over each of the LEDs to see if that would help. Boy what a difference. (This is recommended in the instructions, so it's not like I'm the first person to have this problem or solution.) Now it's a much better experience. I can enjoy the light and sound show without any discomfort.

But even after adjusting the brightness of the lights I wasn't quite sure if it was doing anything for me. Then as I was relaxing with them one day my wife walked into the room and suddenly jolted me out of a trance. And that's when I actually perceived the effect it was having on my state of relaxation. Even though I was fully conscience I had been put into such a relaxed state that when jolted out of it I felt like I was being woken up from a dream.

Now when I want a nap (and it's quiet in the house) I can just slip the Brain Machine on and relax for the 14 minute cycle. When it's over I do really feel better. I don't quite feel physically re-energized, but I'm in a better mental state. In fact, yesterday I went snow caving with my son. It was exhausting with very little sleep. I had some work to do after we got home, but was having a hard time concentrating and feeling motivated to work. So I took a 15 minute break with the Brain Machine and felt better for it. All the benefits of a nap without the pesky side effects.

By the way, my wife dislikes the blinking lights very much, even with 2 pieces of tape (I just use one). So your mileage will vary.